
How do AI multi-agent systems turn Figma designs into code? Learn how they parse codebases, generate code, and speed up frontend feature delivery using AI and step-by-step workflow.
Let me tell you a story every frontend developer knows all too well.
You get a new feature request. The designer sends you a beautiful Figma screen. Product drops a couple of sentences in Slack about what it should do.
And suddenly, it’s all on you.
You’re bouncing between Figma, VS Code, the docs, your repo, and way too many browser tabs. Just figuring out where to put your code can feel like half the job.
But here’s the thing: I wanted AI to help me with this to actually write some of the code.
The problem?
- My repo is huge. Way too big to fit into a single prompt for an AI model. There’s no way to just “upload the whole thing and let it figure it out.”
- Even small features can touch a bunch of different files scattered all over the place.Tracking them down is a pain.
- And if the AI generates code, how do I make sure it fits into my architecture and matches the design system, instead of being random, messy snippets?
So we built something new a multi-agent AI workflow. Instead of dumping the whole repo into the model, we split the work:
- One agent scans the repo and tells us exactly which files matter for the feature.
- Another agent takes that info, reads the design, and writes code that actually fits into the project.
No more context overload. No more guesswork. Just targeted help that saves hours of digging and wiring things together.
In this tutorial, I’m going to show you exactly how we did it.
You’ll see:
- Screenshots from our real project
- Code examples
- Step-by-step how we built this
- And how you can do the same
Let’s get into it.
Why Automate Frontend Features?
Shipping new frontend features often takes more time and effort than it seems.
Usually, it goes like this:
- The design team shares a Figma screen for the new feature.
- The product team gives a brief description of what it should do.
- As the developer, you dig through your codebase to figure out which files, components, and routes need updates.
- You write the new code, making sure it fits your architecture and design system.
- Then you test, commit, and push your changes.
While this might sound simple, it can be slow, repetitive, and mentally exhausting. Constantly jumping between design tools, code editors, and docs can break your focus. Even small features often mean hours spent navigating complex folder structures or understanding legacy code.
We knew there had to be a better way.
So we built a system where AI works alongside developers as a smart assistant. Our multi-agent AI workflow:
- Reads designs from Figma
- Understands your codebase’s structure
- Generates code changes that fit right into your project
By automating these steps, we save time, reduce repetitive work, and free developers to focus on creative problem-solving. It’s not about replacing developers — it’s about helping us work smarter.
Step 1: Prepare your repo for AI
It is not practical to feed an entire codebase into a large language model because the sizeof most repositories exceeds the input limits of these models. To address this challenge, we developed a tool called software that scans the codebase and extracts essential information, including:
- Names of components used throughout the application
- File paths for important modules and screens
- Architecture patterns and structural details
{
   "structure":
   "complete_repo_contents":
   "compressed_Structure":
}
This process generates a concise summary of the repository in JSON or another structured format. The summary makes it possible to provide the AI with only the most relevant context, keeping inputs manageable and focused for downstream tasks.
Here’s part of our output:
{
   "routes": ["/login", "/users"],
   "components": ["UserTable", "HeaderComponent"],
   "files": ["src/screens/users/UsersScreen.tsx", ...]
}
This makes the repo AI-friendly for downstream steps.
Step 2: Feed in the Figma screen
Next, we upload the Figma screen of the feature we want to build.
Here’s the Figma screenshot we used:
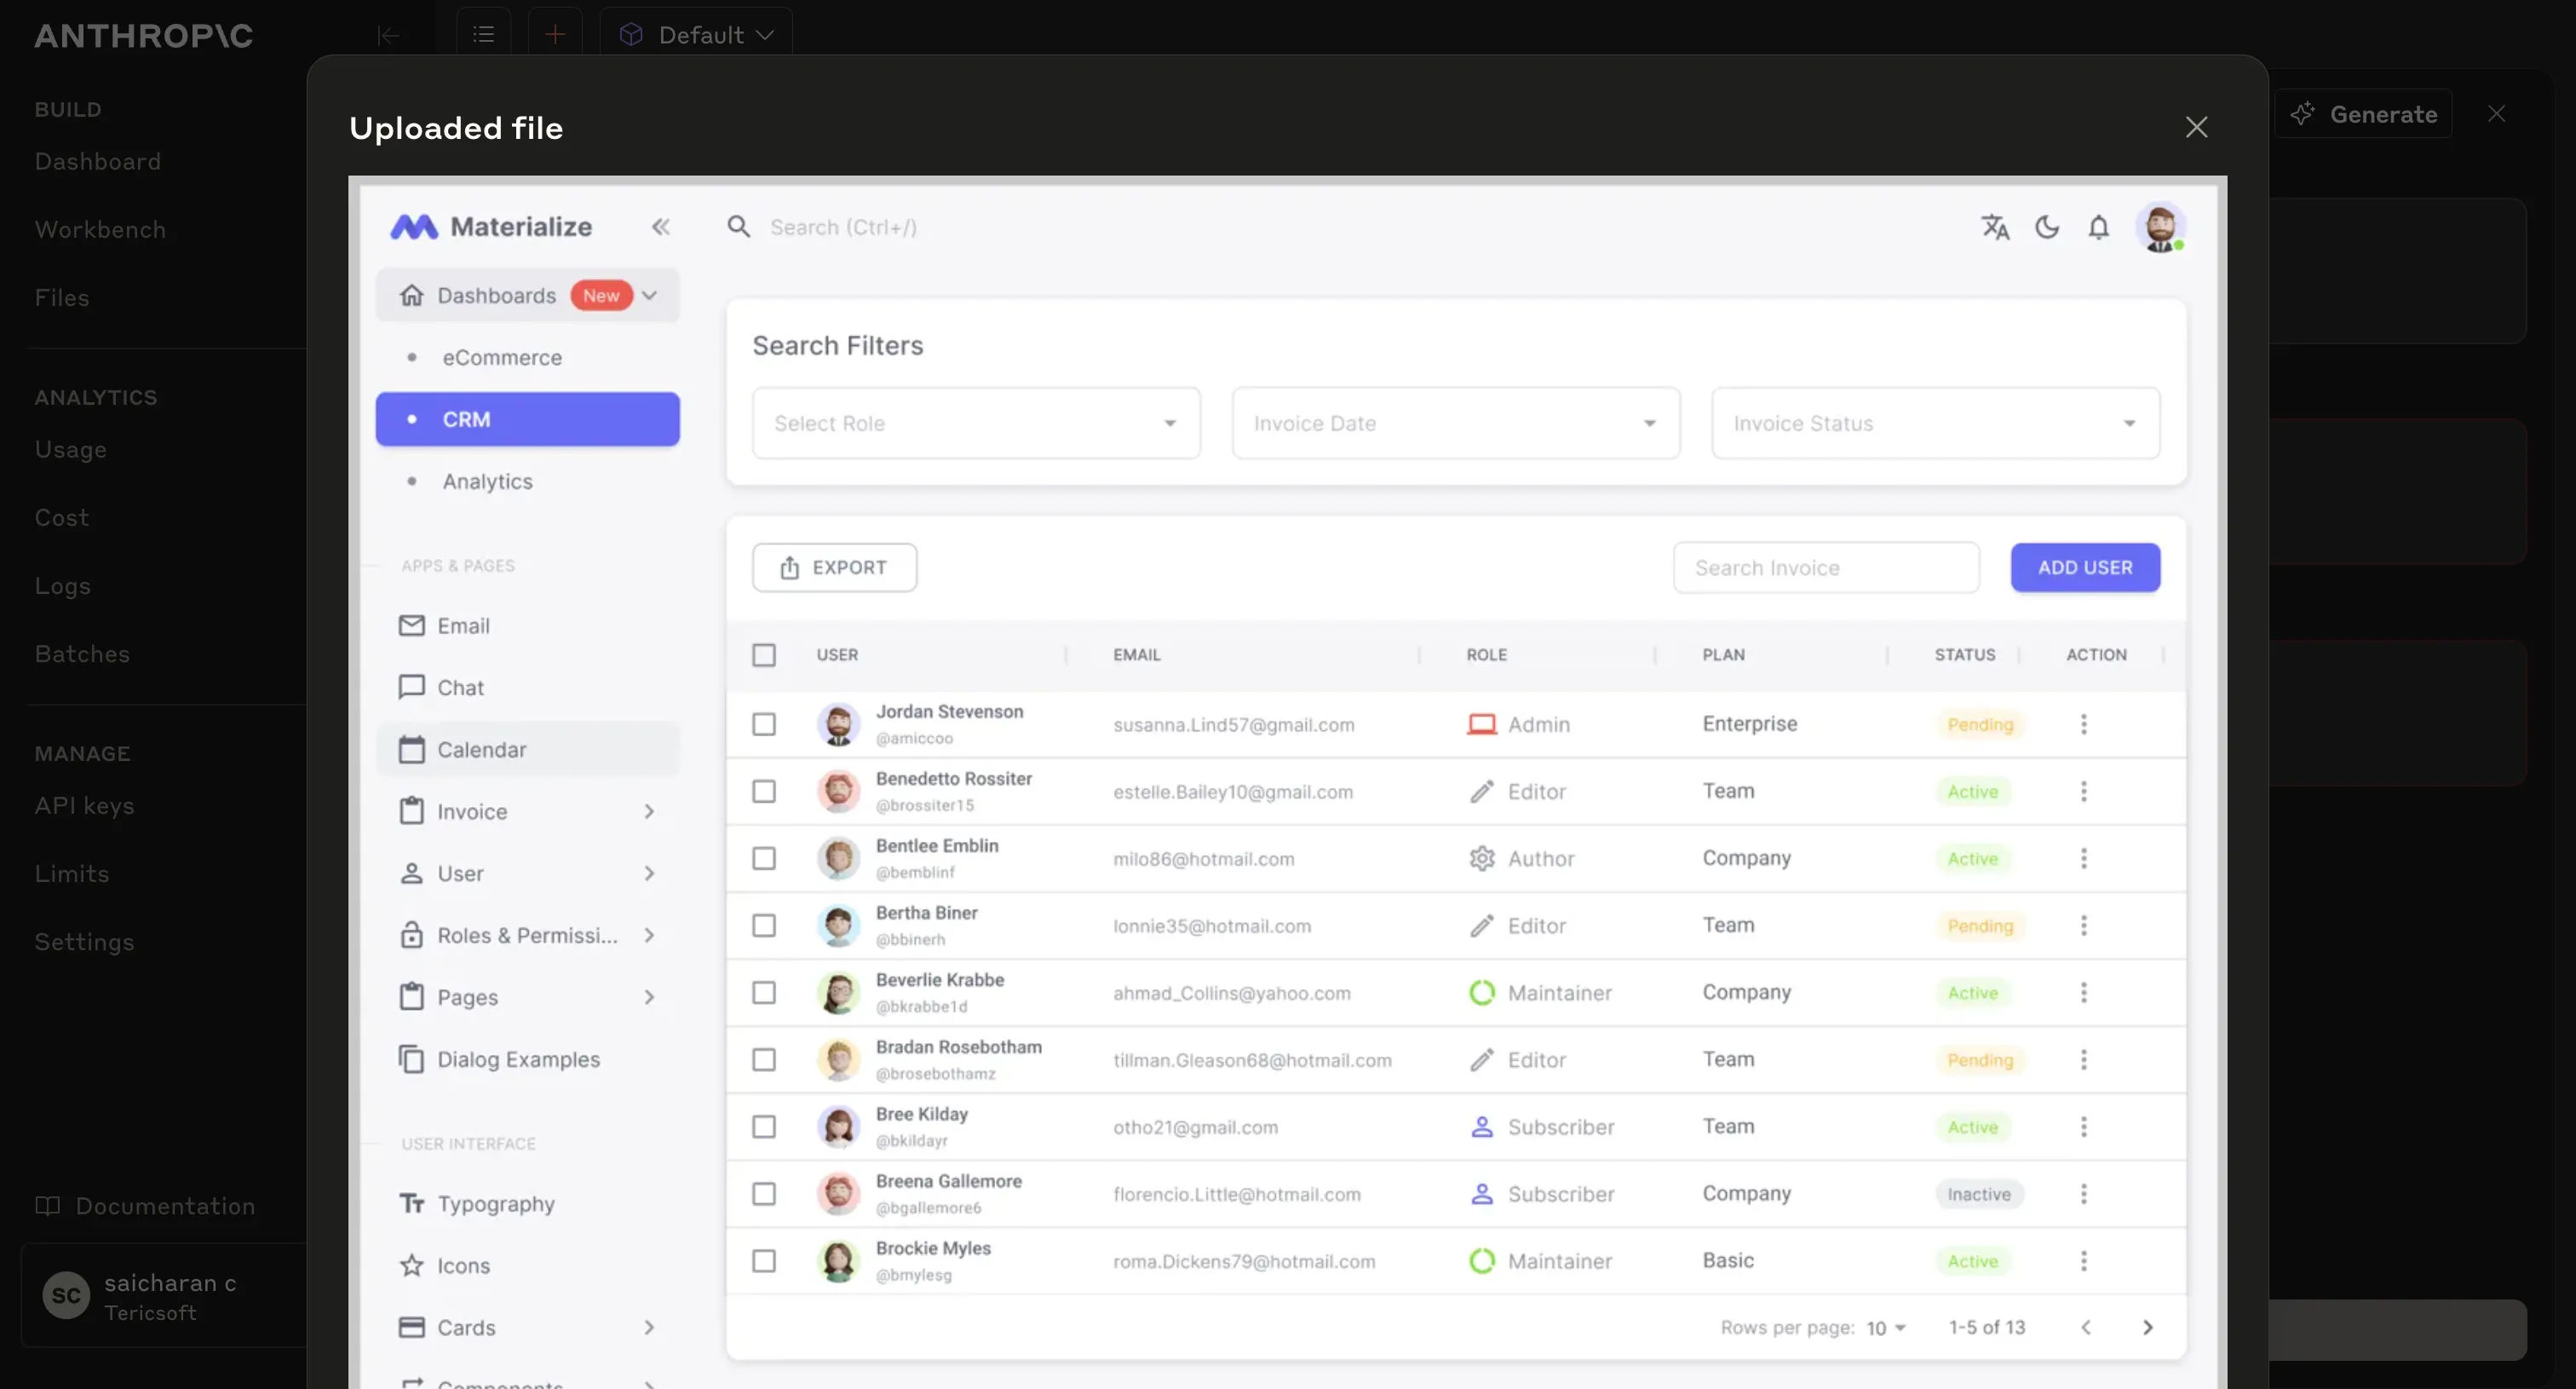
This shows the UI we want to implement—a user table with filters.
Step 3: Let Agent 1 analyze what’s needed
We then instruct Agent 1, which runs on Claude or another large language model, to perform several key tasks:
- Parse the summarized information from the codebase
- Analyze the Figma screenshot to understand the visual and functional requirements
- Identify the specific files that need to be modified or created for the new feature
- Search for similar existing features in the codebase to use as references
Below is an example of the actual prompt we use to guide Agent 1 through this process:
Sample user input:
“Build this screen with current architecture with perfect matching instyle. Take open-source images if needed.”Agent 1 returns a list of relevant files:
- src/screens/users/UsersScreen.tsx
- src/components/table-component/TableComponent.tsx
...
Step 4: Provide relevant code context
Now, rather than sending the entire repo to the LLM, we extract only the files Agent 1 specified.
This helps us stay under token limits and keep the AI focused.
Example output from the repo scan:
<output_code>
"src/App.tsx",
"src/main.tsx",
"src/constants/RoutesConfig.tsx",
"src/constants/index.ts",
"src/navigation/navigator.tsx",
"src/screens/app/layout.tsx",
"src/screens/app/layout.scss",
"src/models/user.model.ts",
"src/models/table.model.ts",
"src/models/common.model.ts",
"src/components/sidebar-component/SideBarComponent.tsx",
"src/components/sidebar-component/SideBarComponent.scss",
"src/components/header/HeaderComponent.tsx",
"src/components/header/HeaderComponent.scss",
"src/components/table-component/TableComponent.tsx",
"src/components/table-component/TableComponent.scss",
"src/components/button-component/ButtonComponent.tsx",
"src/components/button-component/ButtonComponent.scss",
"src/components/select/SelectComponent.tsx"
]
</output_code>
Step 5: Let Agent 2 generate the code
Now we prompt Agent 2 to:
- Generate code for the feature
- Follow the existing architecture, styles, and design system
- Insert the new code into the right places
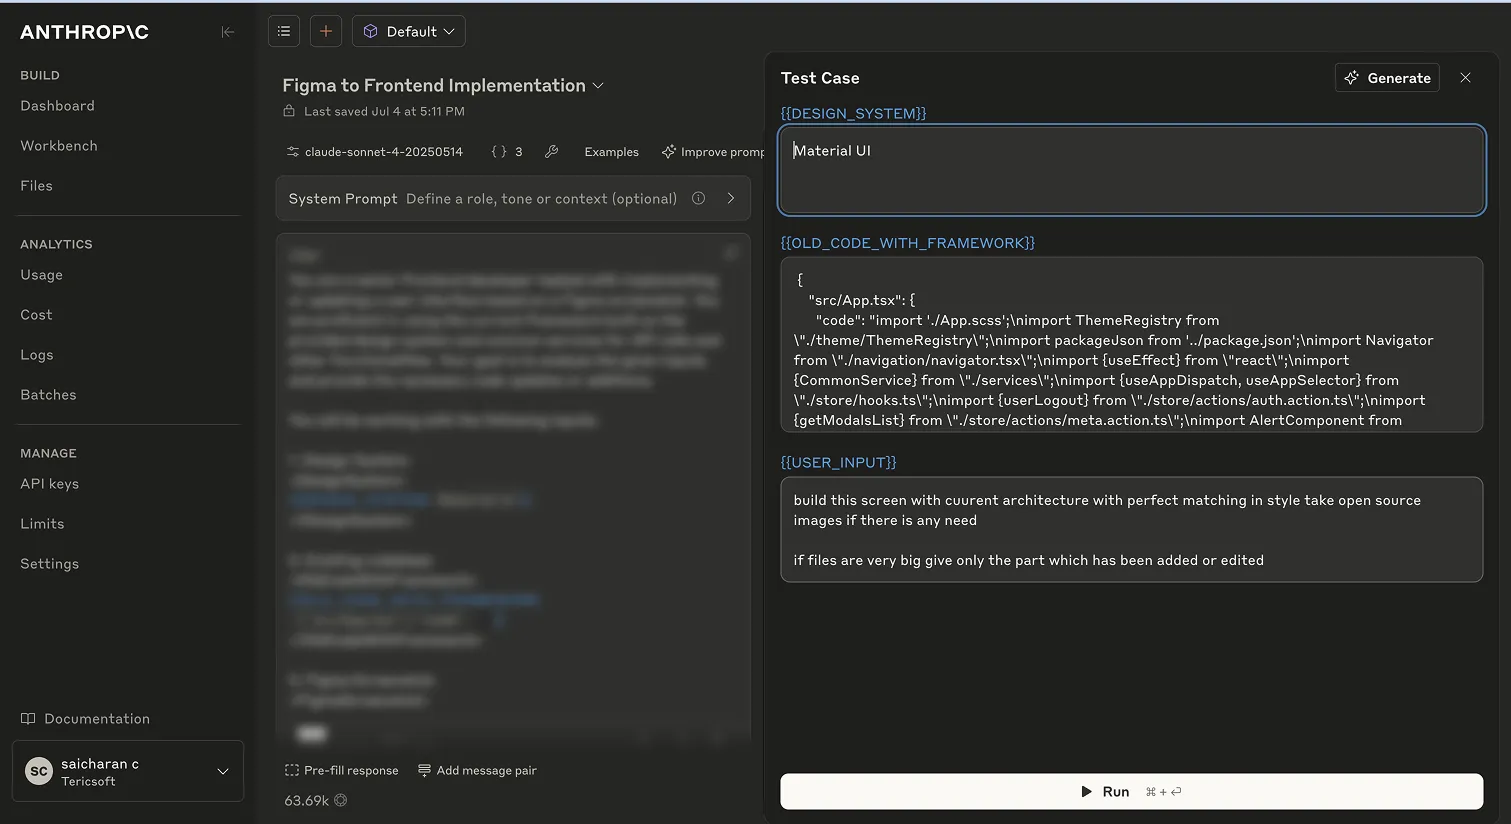
Here’s how we set it up:
Sample context:
- Design system: Material UI
- Existing code: Pulled from previous step
- User instruction: “Build the screen matching the design.”
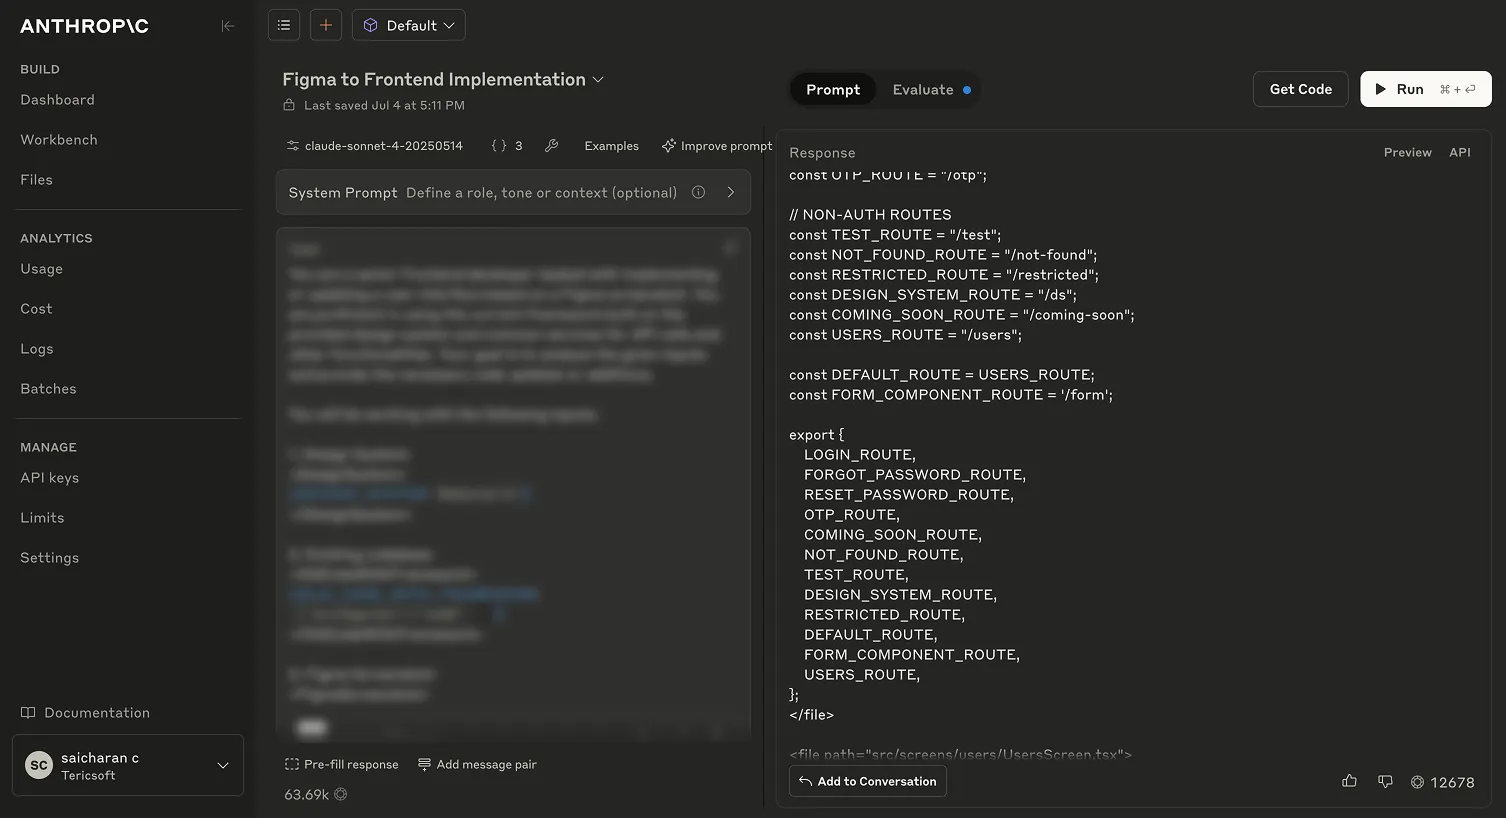
Here’s part of the code generated:
const LOGIN_ROUTE = "/login";
const USERS_ROUTE = "/users";
...
export {
LOGIN_ROUTE,
USERS_ROUTE,
};
And new React components for the screen:
import React from 'react';
function UsersScreen() {
// JSX matching the Figma UI
}
export default UsersScreen;
Step 6: Commit changes automatically
Once the AI generates the code, software stages and commits changes:
- Creates a new branch
- Adds modified files
- Commits with a message
Here’s our terminal output:

Step 7: Review and tweak
We never merge AI-generated code without thorough verification.
Instead, we follow a careful review process to ensure the quality and correctness of the output:
- We examine the changes produced by the AI to confirm they align with project standards and requirement
- We test the feature both visually and functionally to validate that it behaves as expected.
- We apply any necessary adjustments or refinements to improve the implementation.
Below is an example of the final result after these steps are completed:

Results
To illustrate how the entire workflow comes together, here is a side-by-side comparison of the key stages in the process:
- Input Design: The original Figma screenshot provided by the design team, showing the visual layout and intended user experience for the new feature.
- Generated Code Output: The code automatically produced by the AI, based on the design and the analysis of the existing codebase. This demonstrates how the AI translates visual designs and feature requirements into real code.
- Final Implemented UI: A screenshot of the feature running in the browser after testing and any necessary refinements. This confirms that the AI-generated code integrates successfully into the application and matches the original design intent.
To illustrate how the entire workflow comes together, here is a side-by-side comparison of the key stages in the process:
How to build this yourself
To replicate our process:
- Use a tool like Tree-sitter to parse and index your repo.
- Upload Figma screenshots to an LLM with vision capability.
- Prompt the LLM carefully:
"You’re a senior frontend developer. Here’s the repo structure, a Figma screenshot, and my feature request. Return a list of files to change."
- Extract only relevant code for context.
- Feed it to an LLM for code generation.
- Automate git steps via a script.
- Always review the final code.
What’s next?
We’re extending this workflow to:
- Handle both custom-built and third-party backend services.
- Auto-generate unit tests
- Support multi-repo systems
Final thoughts
AI is not here to replace developers; it is here to enhance their capabilities.
Our multi-agent system delivers several advantages:
- It speeds up the development of new features.
- It helps reduce the risk of human errors.
- It enables developers to focus on creative problem-solving instead of repetitive tasks.
The future of frontend development is not something far off in the distance. It is already taking shape today.
Agent 1 scans the repo and identifies only the relevant files needed for the feature.
No, the AI uses a summarized structure of your repo to stay within token limits.
The AI reads the Figma screen and matches the design with your existing code and architecture.
No, the code is reviewed, tested, and tweaked before merging.
One agent finds files, the other generates code that fits into the project seamlessly.